
Last updated: June 13, 2026
Quick Answer: To use Excel for data entry, open a workbook, click a cell, type your data, and press Tab to move right or Enter to move down. For structured, error-free entry, format your range as an Excel Table, add data validation rules, and use shortcuts like Ctrl+D and Flash Fill to speed up repetitive tasks. Anyone from a first-time user to a small business owner can get productive in Excel within a day.
Key Takeaways
- Start with a Table: Convert your data range to an Excel Table (Ctrl+T) so rows, formulas, and formatting expand automatically as you add records.
- Use Tab and Enter to navigate cells quickly — Tab moves right, Enter moves down, and Shift+Tab moves back left.
- Data Validation prevents wrong entries by limiting what can be typed into a cell (dropdown lists, date ranges, number limits).
- Flash Fill (Ctrl+E) detects patterns and fills data automatically — great for splitting names or reformatting IDs.
- Keyboard shortcuts like Ctrl+D (fill down) and Ctrl+Enter (fill multiple cells at once) cut entry time significantly.
- Excel’s built-in data entry Form (added via Quick Access Toolbar) lets you enter records one at a time in a clean dialog box.
- Excel works for businesses of all sizes — from solo freelancers tracking invoices to teams managing thousands of records.
- No tech background is required to start; basic data entry in Excel takes less than an hour to learn.
- Free Excel templates (timesheets, schedules, trackers) give you a ready-made structure so you don’t start from scratch.
- Google Sheets is a solid free alternative, but Excel has stronger offline performance, more advanced validation, and better automation options.
What Are the Basic Steps for Data Entry in Excel
Learning how to use Excel for data entry starts with a few simple actions that build into a solid workflow. Open Excel, click any cell, type your value, and press Enter or Tab to confirm and move to the next cell. That’s the core loop — everything else is built on top of it. [3]
Here’s the step-by-step flow for setting up a clean data entry sheet:
- Open a new workbook and click cell A1.
- Type your column headers (e.g., Date, Name, Amount, Status) across row 1.
- Press Tab after each header to move right; press Enter to drop to the first data row.
- Enter your first record across the row, pressing Tab between fields.
- Select your entire range (headers + data) and press Ctrl+T to convert it to an Excel Table.
- Save your file with Ctrl+S — use .xlsx format for compatibility.
💡 Pro tip: Always put headers in row 1 and start data in row 2. Mixing labels and data in the same row causes problems with sorting, filtering, and formulas later.
For a broader foundation, the how to use Excel step-by-step for beginners guide walks through the full interface before you dive into data entry.
How Do I Quickly Enter Data Without Making Mistakes
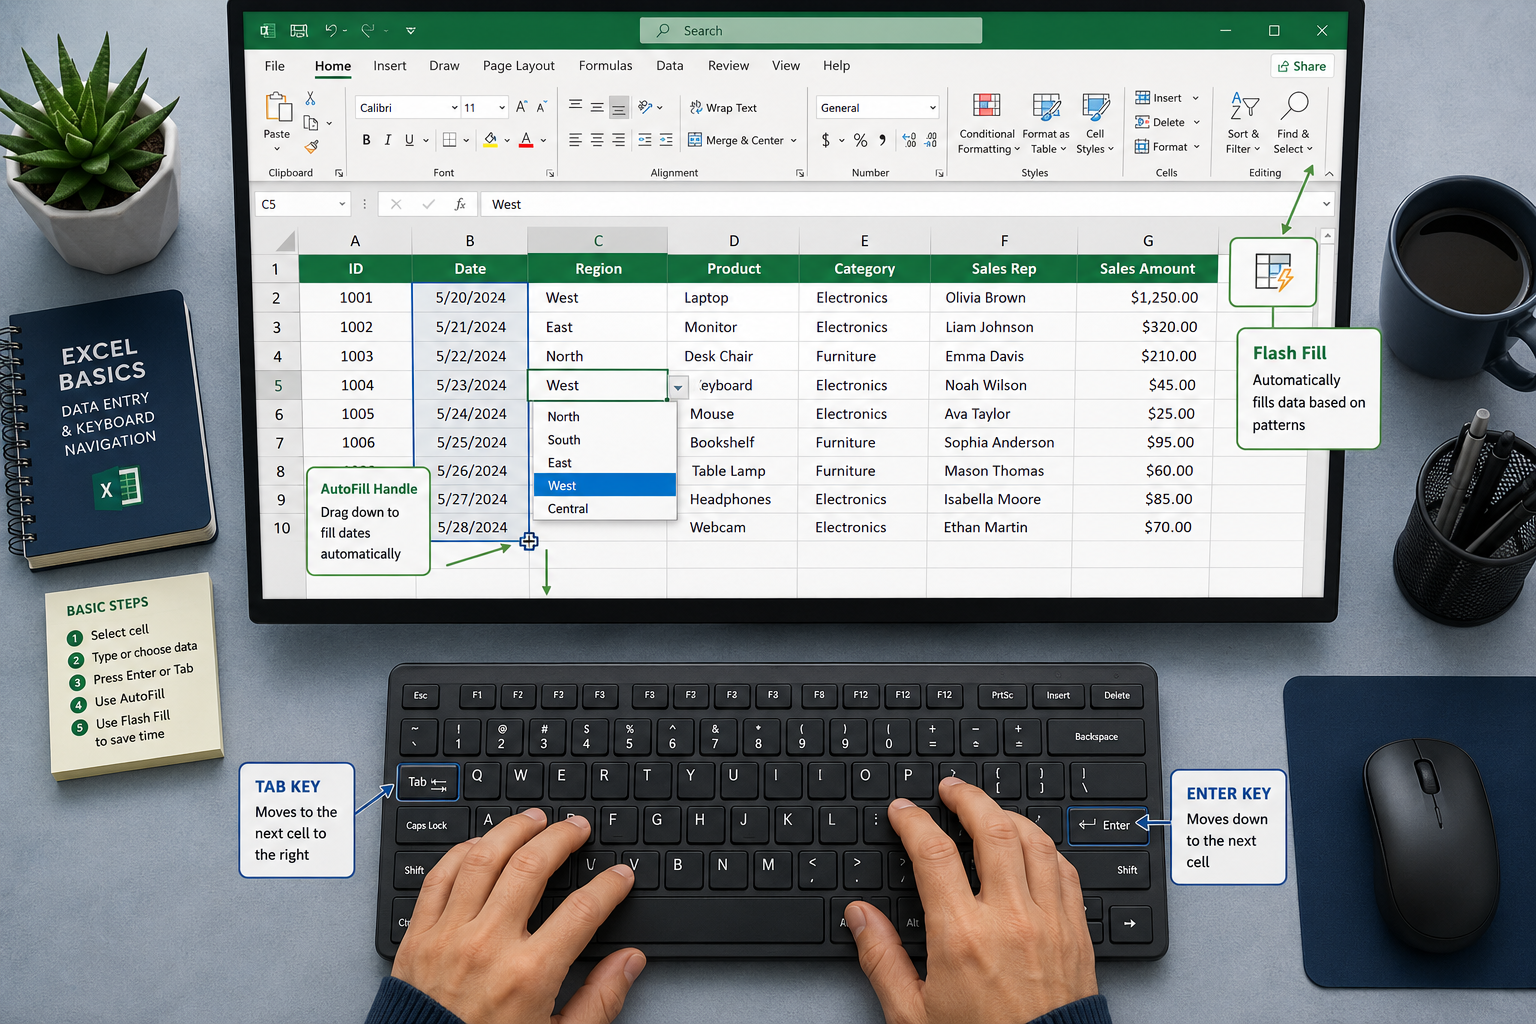
Speed and accuracy in Excel data entry come from two things: using the right navigation keys and letting Excel do repetitive work for you. The biggest time-savers are Tab/Enter navigation, AutoFill, Flash Fill, and Ctrl+Enter for filling multiple cells at once. [2]
Navigation shortcuts that matter most:
| Shortcut | What It Does |
|---|---|
| Tab | Move one cell to the right |
| Enter | Move one cell down |
| Shift+Tab | Move one cell to the left |
| Ctrl+Enter | Fill all selected cells with the same value |
| Ctrl+D | Fill the selected cell(s) downward |
| Ctrl+R | Fill the selected cell(s) to the right |
| Ctrl+E | Flash Fill — detects and continues a pattern |
Flash Fill is especially useful. Type a few examples of what you want (say, extracting first names from a “Full Name” column), then press Ctrl+E and Excel fills the rest automatically. The Journal of Accountancy highlighted Flash Fill as one of the most practical tools for reducing repetitive data entry in accounting workflows. [2]
AutoFill works by dragging the small green square (fill handle) at the bottom-right corner of a cell. Drag a date down and Excel increments it by day. Drag a number series (1, 2) and it continues the pattern.
Common mistake to avoid: Pressing Enter after the last field in a row sends your cursor down, not to the next row’s first field. Instead, press Tab across all fields in a row — when you press Enter at the last field, Excel jumps back to the first column of the next row automatically (as long as you used Tab throughout that row).
Best Practices for Organizing Data in Spreadsheets
Well-organized spreadsheet data is easier to sort, filter, analyze, and share. The single most important practice is keeping one piece of information per column and one record per row — never merge data types in a single cell. [6]
Key organization rules:
- One table per sheet: Don’t stack multiple unrelated tables on the same worksheet.
- No blank rows or columns inside your data: Blank rows break sorting, filtering, and formulas.
- Consistent data formats: If a column holds dates, every cell should be a date — not a mix of dates and text.
- Freeze your header row so column labels stay visible as you scroll down. (View > Freeze Panes > Freeze Top Row.)
- Use an Excel Table (Ctrl+T): Tables auto-expand, apply banded row formatting, and make formulas easier to write. [6]
After your data is in shape, you may want to display it visually. The how to use Excel to calculate guide covers formulas that work directly with organized table data.
If your columns are too narrow to read, expanding all columns in Excel at once takes just two clicks and makes your sheet immediately more readable.
Excel Shortcuts That Save Time During Data Entry
The right keyboard shortcuts cut data entry time dramatically — experienced users rarely touch the mouse during active entry. [4]
Beyond the navigation shortcuts above, these are worth memorizing:
- Ctrl+; (semicolon): Insert today’s date instantly.
- Ctrl+Shift+; (colon): Insert the current time.
- Alt+Enter: Start a new line inside a cell (without leaving it).
- F2: Edit the active cell without using the mouse.
- Ctrl+Z / Ctrl+Y: Undo / Redo.
- Ctrl+Home / Ctrl+End: Jump to the beginning or end of your data.
For date and time entry specifically, the formula to add date and time in Excel 365 resource shows how to auto-populate timestamps — a major time-saver for logs and trackers.
How to Validate Data to Prevent Incorrect Entries
Data Validation is Excel’s built-in system for blocking bad entries before they happen. Set it up once and Excel will reject any value that doesn’t meet your rules — no manual checking needed. [3]
How to add a dropdown list (the most common validation type):
- Select the cells where you want the dropdown.
- Go to Data > Data Validation.
- Under “Allow,” choose List.
- In the “Source” box, type your options separated by commas (e.g., Pending, Approved, Rejected) or select a range of cells.
- Click OK.
Other validation types worth using:
- Whole number / Decimal: Restrict entries to a number range (e.g., quantities between 1 and 500).
- Date: Only allow dates within a specific range.
- Text length: Cap the number of characters in a field.
- Custom formula: Write your own rule for complex conditions.
🛡️ Why this matters: A single wrong entry in a data column can break a formula or produce a misleading report. Validation stops the error at the source rather than downstream.
Common Data Entry Errors in Excel and How to Avoid Them
The most common Excel data entry errors are inconsistent formatting, accidental overwrites, mixed data types, and trailing spaces that break lookups. Most of these are preventable with a few habits. [2]
Top errors and fixes:
| Error | Why It Happens | How to Fix It |
|---|---|---|
| Trailing spaces | Copied text from another source | Use =TRIM() to clean cells |
| Date stored as text | Typed “Jan 5” instead of 1/5/2026 | Format column as Date before entry |
| Duplicate records | No check in place | Use Conditional Formatting to highlight duplicates |
| Wrong data type in column | No validation set | Add Data Validation rules (see above) |
| Accidental overwrite | No protection on key cells | Lock formula cells via Format Cells > Protection |
For visual cleanup, applying color to alternate rows using Conditional Formatting also makes it easier to spot misaligned entries at a glance.
Is Excel Good for Small Business or Just Large Companies
Excel is genuinely useful for businesses of every size, and it’s often the best starting point for small businesses that don’t yet need dedicated database software. A solo freelancer can track invoices, a five-person team can manage a client list, and a 50-person company can run operational reports — all in Excel. [4]
Choose Excel if:
- Your dataset has fewer than ~100,000 rows (Excel’s practical limit for smooth performance).
- You need offline access and don’t want to rely on internet connectivity.
- Your team already has Microsoft 365 licenses.
- You want built-in charting, formulas, and pivot tables in one tool.
Consider alternatives when:
- Multiple people need to edit the same file simultaneously in real time (Google Sheets handles this better).
- Your data exceeds Excel’s row limits or needs relational structure (use a database like Access or SQL).
- You need automated workflows triggered by external events (use Power Automate or dedicated CRM software).
For small business time tracking specifically, the ready-to-use weekly timesheet template for Excel 365 is a free, practical starting point.
Excel vs Google Sheets for Data Entry
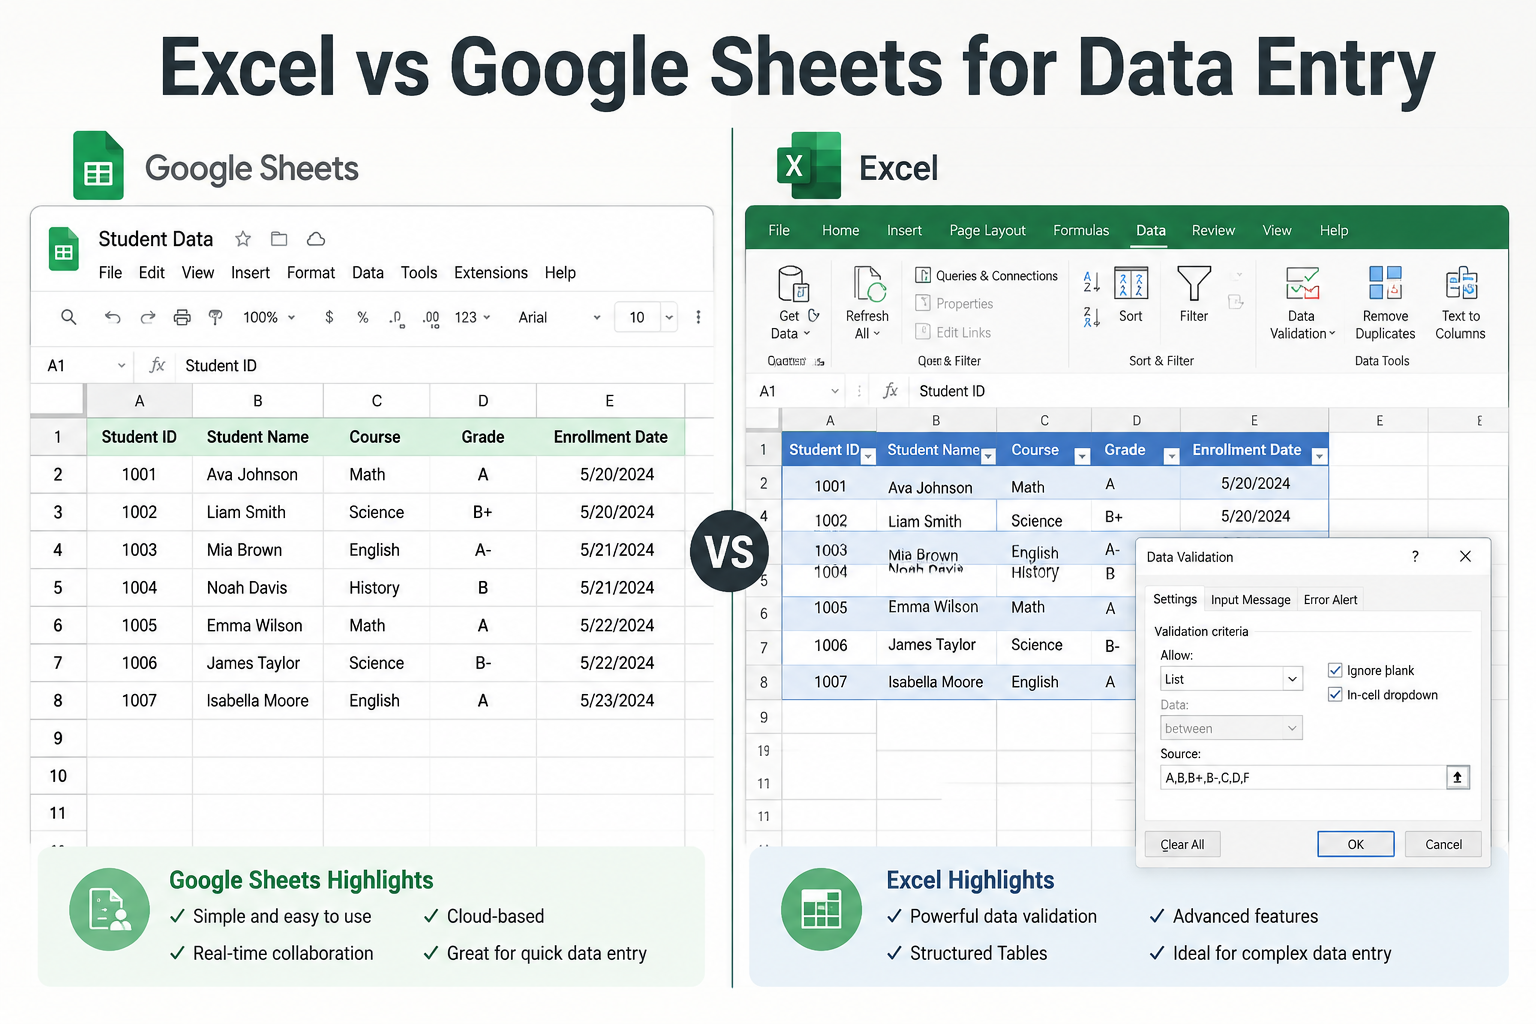
For most individual data entry tasks, both tools work well — but they have real differences worth knowing. Excel has stronger offline capability, more advanced data validation, better performance with large datasets, and richer automation via macros and Power Query. Google Sheets wins on real-time collaboration and being completely free. [2]
Quick comparison:
| Feature | Excel | Google Sheets |
|---|---|---|
| Cost | Paid (Microsoft 365) | Free |
| Offline use | ✅ Full functionality | ⚠️ Limited |
| Real-time collaboration | ✅ Good (365) | ✅ Excellent |
| Data Validation | ✅ Advanced | ✅ Basic |
| Row limit | ~1,048,576 | ~10,000,000 (but slower) |
| Macros / Automation | ✅ VBA + Power Query | ✅ Apps Script |
| Flash Fill | ✅ Yes | ❌ No |
Bottom line: If you’re learning how to use Excel for data entry in a workplace setting, Excel is the safer skill to build — it’s the standard in most professional environments and job listings. [4]
What Skills Do I Need to Do Data Entry in Excel
Basic Excel data entry requires no programming knowledge and minimal technical background. The core skills are cell navigation, typing data into structured rows and columns, and understanding how to format cells correctly. [4]
Skill levels, from beginner to intermediate:
- Beginner (Day 1): Open/save files, type in cells, use Tab/Enter, basic formatting (bold, date format, number format).
- Early intermediate (Week 1): Create Tables, use AutoFill, add Data Validation dropdowns, freeze header rows.
- Intermediate (Month 1): Use Flash Fill, write basic formulas (SUM, IF, VLOOKUP), sort and filter data, use the built-in data entry Form.
Job listings for Excel data entry roles in 2026 commonly list sorting, filtering, basic formulas, and table management as expected skills — not just typing speed. [4]
Can Someone with No Tech Background Learn Excel Data Entry
Yes — Excel data entry is one of the most accessible office skills to pick up, even with zero prior tech experience. The basic workflow (click a cell, type, press Enter) mirrors how most people already think about filling in a form. [3]
Most beginners can handle simple data entry tasks within a few hours of practice. The learning curve steepens when you add formulas, validation, and automation — but those are optional layers, not requirements for getting started.
Realistic learning timeline:
- 1–2 hours: Navigate cells, enter text and numbers, save files.
- Half a day: Format columns, freeze rows, create a basic Table.
- 1–2 days: Add Data Validation, use Flash Fill, understand AutoFill.
- 1–2 weeks: Write basic formulas, use the data entry Form, sort/filter confidently.
Free Excel Templates for Different Types of Data Entry
Free Excel templates give you a pre-built structure so you can start entering data immediately without designing a sheet from scratch. Microsoft’s template library (accessible from File > New in Excel) includes hundreds of options, and many third-party sites offer specialized versions. [7]
Useful template types for data entry:
- Weekly timesheet — track hours by employee or project. (Ready-to-use timesheet template)
- Schedule template — manage shifts, appointments, or project tasks. (Schedule template for Excel 365)
- Expense tracker — log business or personal spending with category dropdowns.
- Inventory log — track stock levels, reorder points, and supplier info.
- Contact list / CRM lite — store client names, emails, and follow-up dates.
When you find a template you like, convert its data range to an Excel Table (Ctrl+T) before you start entering records — this ensures the structure scales cleanly as your data grows. [6]
How Much Faster Is Excel Compared to Manual Data Logging
Excel is significantly faster than paper-based or unstructured digital logging for any data set larger than a few dozen records. Features like AutoFill, Flash Fill, dropdown validation, and keyboard shortcuts eliminate repetitive keystrokes that add up quickly over hundreds of rows. [2]
While exact speed comparisons depend on the task and the user’s skill level, the efficiency gains are well-documented in professional training contexts:
- AutoFill can populate an entire column of sequential dates or IDs in seconds instead of minutes.
- Flash Fill can reformat or split hundreds of entries in one keystroke (Ctrl+E).
- Ctrl+D fills a formula or value down an entire selected column instantly.
- Data Validation dropdowns let users select from a list rather than typing, cutting both time and errors.
The practical takeaway: the more repetitive your data, the bigger the time savings Excel delivers over manual entry methods. [2]
FAQ
Q: What is the fastest way to enter the same value in multiple cells in Excel? Select all the cells you want to fill, type the value, then press Ctrl+Enter. Excel fills every selected cell at once.
Q: How do I stop Excel from auto-correcting my entries? Go to File > Options > Proofing > AutoCorrect Options and uncheck the rules that are causing problems, or turn off AutoCorrect entirely.
Q: Can I use Excel for data entry on a phone or tablet? Yes. The Excel mobile app (iOS and Android) supports basic data entry, but keyboard shortcuts and advanced features like Data Validation are easier to use on a desktop or laptop.
Q: What is the Excel data entry Form and how do I access it? The Form command lets you enter records one at a time in a pop-up dialog. Add it to your Quick Access Toolbar by going to File > Options > Quick Access Toolbar, then searching for “Form” and adding it. [10]
Q: How do I prevent duplicate entries in Excel? Use Data Validation with a custom formula: select your column, go to Data > Data Validation, choose “Custom,” and enter =COUNTIF($A$2:$A$1000,A2)=1. This blocks any value already in the column.
Q: Is it better to use a Form or type directly into cells? For structured records with many fields, the built-in Form is cleaner and reduces errors. For simple, fast entry with few columns, typing directly into cells with Tab navigation is quicker. [7]
Q: What file format should I save an Excel data entry file in? Use .xlsx for standard use. Use .xlsm if your file contains macros. Avoid .xls (older format) unless you need compatibility with very old software.
Q: How do I make a column only accept numbers in Excel? Select the column, go to Data > Data Validation, choose “Whole Number” or “Decimal” under Allow, then set your minimum and maximum values.
Q: Can Excel handle large data entry projects with thousands of rows? Yes. Excel supports up to 1,048,576 rows per sheet. For datasets approaching that limit, performance can slow — Power Query or a database tool may be a better fit for very large projects. [8]
Q: Do I need to know formulas to do data entry in Excel? No — basic data entry only requires typing and navigation. Formulas become useful when you want Excel to calculate or transform your data automatically, but they’re not required to get started. [3]
Conclusion
Knowing how to use Excel for data entry is one of the most practical skills anyone can build in 2026 — whether you’re managing a small business, working a remote data entry role, or just trying to stay organized. The workflow is straightforward: set up a Table, use Tab and Enter to navigate, add Data Validation to catch errors early, and lean on shortcuts like Flash Fill and Ctrl+D to move fast.
Actionable next steps:
- Open Excel and create a new sheet with at least 4 column headers.
- Press Ctrl+T to convert your range to a Table.
- Add a dropdown validation list to at least one column (Data > Data Validation > List).
- Practice using Tab to move across a row and Enter to start the next record.
- Try Flash Fill (Ctrl+E) on a column of names or IDs to see how it detects patterns.
- Explore a free timesheet or schedule template to see a real-world data entry structure in action.
The best way to get comfortable is to use Excel on a real task — even a simple grocery list or expense log — rather than practicing on dummy data. Once the basics click, the more advanced features (forms, macros, Power Query) become natural next steps.
References
[1] Excel Data Entry Work Software | Data Entry with Excel New Features – https://www.youtube.com/watch?v=t8zZP8nYtpk [2] Use Excel’s Built-In Features to Simplify Data Entry – https://www.techrepublic.com/article/use-excels-built-in-features-to-simplify-data-entry/ [3] Enter Data Manually in Worksheet Cells – https://support.microsoft.com/en-gb/office/enter-data-manually-in-worksheet-cells-c798181d-d75a-41b1-92ad-6c0800f80038 [4] Data Entry in Excel – https://www.linkedin.com/pulse/data-entry-excel-rizwan-farooq-j800f [5] How To Make An Automated Data Entry Form in Excel – https://www.youtube.com/watch?v=gbnMq5A1tRE [6] How to Automate Data Entry in Excel – https://www.geeksforgeeks.org/excel/how-to-automate-data-entry-in-excel/ [7] Excel Data Entry Form – https://www.jotform.com/blog/excel-data-entry-form/ [8] Do This with Excel to Actually Save Time in 2026 – https://www.youtube.com/watch?v=2Ux_dZj7hQY [10] Excel: Creating Data Entry Forms – https://learn.microsoft.com/en-us/answers/questions/5028905/excel-creating-data-entry-forms