
Click here to view our video tutorial.
Click here to download our PDF tutorial.
Planning a trip involves juggling a lot of moving pieces — flight times, hotel confirmations, daily activities, and of course, your budget. Rather than tracking all of this across scattered notes or separate apps, Excel 365 offers a simple solution built right in: ready-made templates you can access in just a few clicks.
One of the most useful of these is the Trip Planner template, a pre-formatted workbook designed to keep every detail of your trip organized in one place. It comes with dedicated tabs for your travel information, lodging, planned activities, and budget, so you don’t have to build a tracking system from scratch.
In this guide, we’ll walk through exactly how to find the Trip Planner template inside Excel, create your own copy, and take a quick tour of what each tab has to offer.
Step 1: Open the File Menu
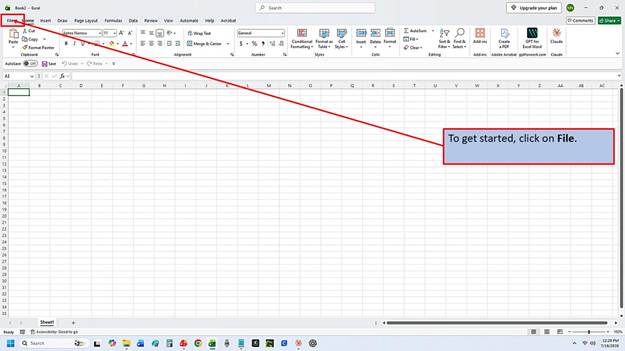
Every new Excel document — including templates — starts from the File menu. With Excel open, look to the top left corner of the ribbon and click on File.
Step 2: Click New
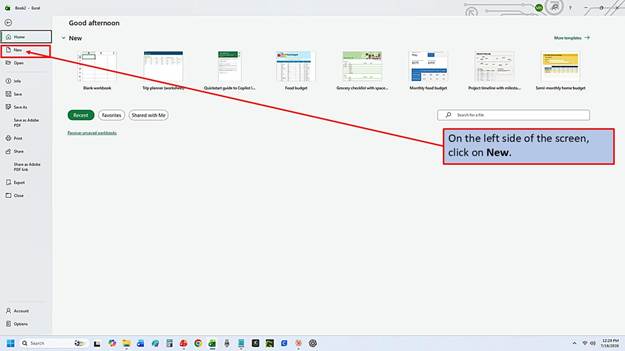
Clicking File opens Excel’s Backstage view, which is where you’ll manage things like opening, saving, and creating documents. On the left-hand side of this screen, click on New. This takes you to Excel’s template gallery, where you can browse a wide selection of professionally designed templates instead of starting from a blank workbook.
Step 3: Search for a Trip Planner Template
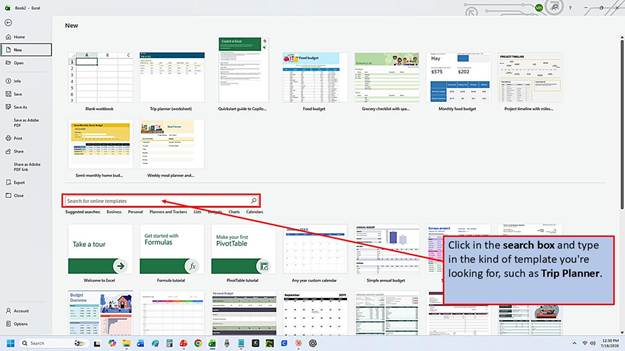
The template gallery includes a search box at the top of the screen. Click inside it and type in the kind of template you’re looking for — in this case, Trip Planner. Excel’s search isn’t limited to trip planning, either; you can use this same search box to find templates for budgets, calendars, invoices, and dozens of other everyday tasks.
Step 4: Run Your Search
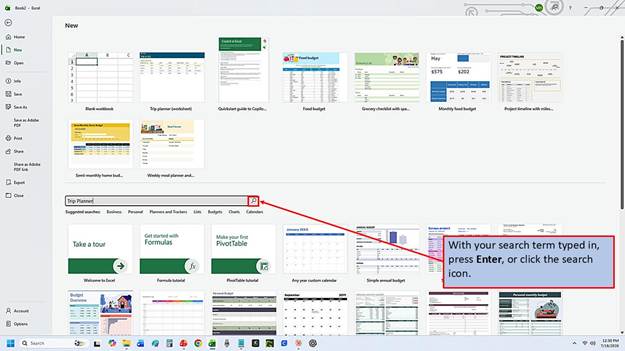
Once you’ve typed in your search term, press Enter on your keyboard, or click the magnifying glass icon next to the search box, to see the results.
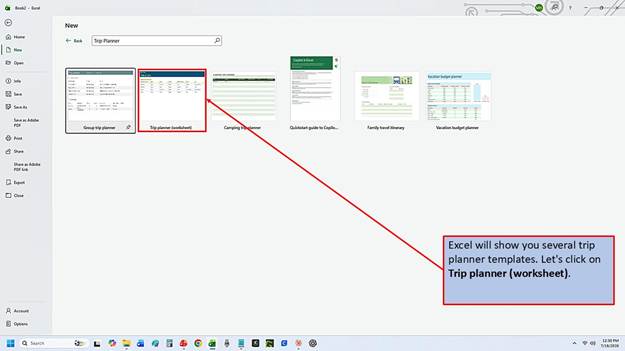
Step 5: Select the Trip Planner Template
Excel will return several trip planner options to choose from. For this walkthrough, we’ll select Trip planner (worksheet). Each thumbnail gives you a small preview of the template’s layout, so feel free to click through a few options if you’d like to compare styles before settling on the one that fits your trip best.
Step 6: Review and Create
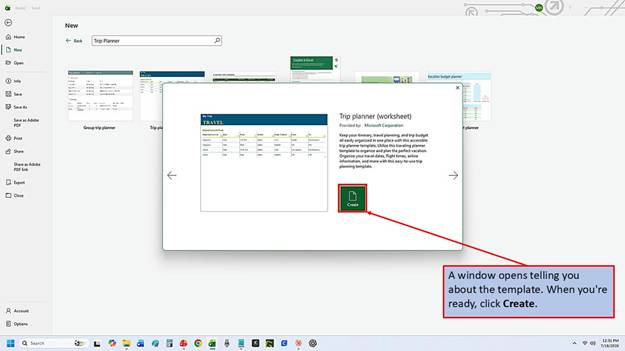
After selecting a template, Excel opens a preview window with a short description of what the template includes. Take a moment to review it, and when you’re ready, click Create.
Step 7: Your New Workbook Opens
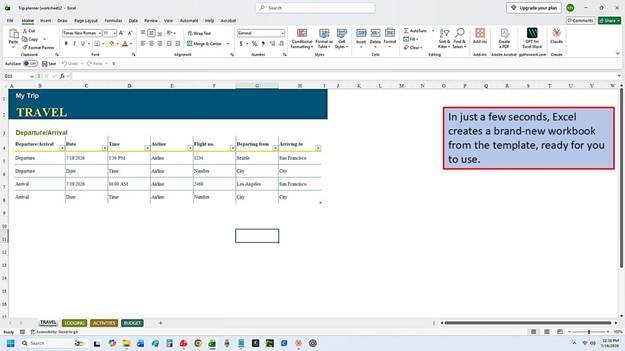
In just a few seconds, Excel builds a brand-new workbook from the template you selected. It’s fully editable and ready for your own trip details right away — no extra setup required.
Getting to Know Your Trip Planner Tabs
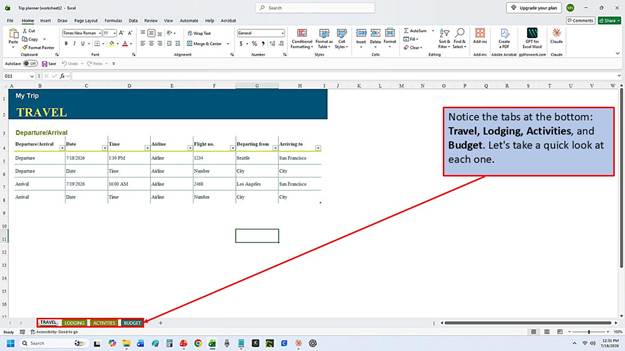
Along the bottom of the workbook, you’ll notice four tabs: Travel, Lodging, Activities, and Budget. Each one is designed to hold a different piece of your trip planning, so let’s take a quick look at what you’ll find on each.
The Travel Tab
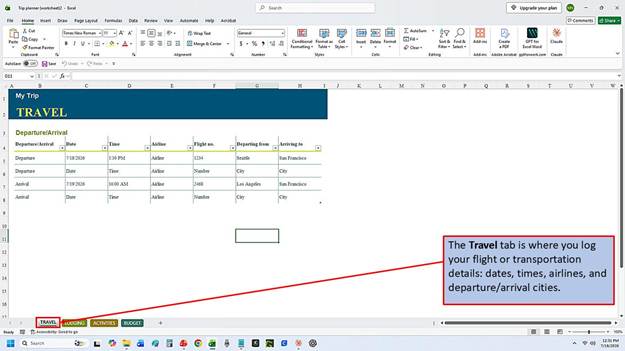
The Travel tab is where you’ll log your flight or transportation details, including dates, times, airlines, and your departure and arrival cities. It’s a handy spot to keep confirmation details all in one place instead of digging through email.
The Lodging Tab
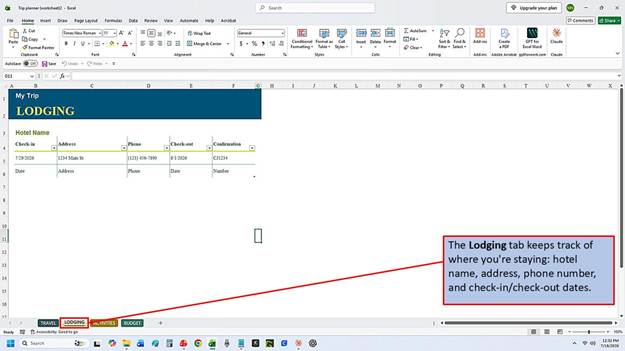
The Lodging tab keeps track of where you’re staying throughout your trip. Fill in the hotel name, address, and phone number, along with your check-in and check-out dates, so everything is easy to reference while you’re on the road.
The Activities Tab
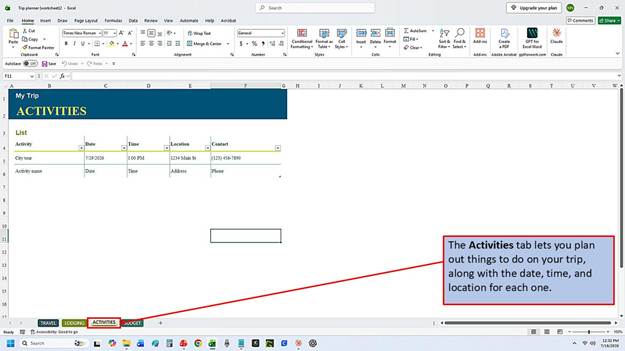
The Activities tab lets you plan out things to do during your trip. For each activity, you can note the date, time, and location, which makes it easy to build out a day-by-day itinerary.
The Budget Tab
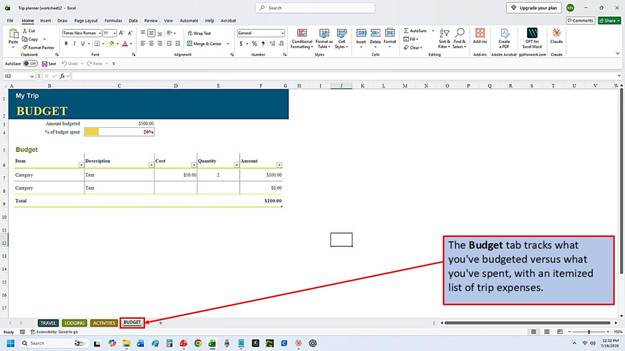
The Budget tab tracks what you’ve budgeted against what you’ve actually spent, with an itemized list of trip expenses. It’s a simple way to keep an eye on your spending as your trip comes together.
With just a few clicks, you now have a fully organized workbook ready to help you plan your next trip from start to finish. Simply replace the sample information on each tab with your own travel details, and you’ll have everything in one place — no more piecing together notes from different apps or scraps of paper. The next time you’re getting ready for a trip, give Excel’s built-in Trip Planner template a try and see how much easier it makes staying organized.
Video Tutorial
Download PDF Below