
Last updated: June 25, 2026
Quick Answer: To remove duplicates in Excel, select your data range, go to the Data tab, click Remove Duplicates, choose which columns to check, and click OK. Excel keeps the first occurrence of each duplicate row and permanently deletes the rest. Always back up your file first, since this action cannot always be undone after saving.
Key Takeaways
- The Remove Duplicates button (Data tab) is the fastest built-in method for most users.
- Excel keeps the first occurrence by default; keeping the last requires a workaround.
- Removing duplicates permanently deletes rows — back up your data before proceeding.
- You can check duplicates against specific columns only, not just the whole row.
- The UNIQUE function (Excel 365/2019) returns a clean list without touching original data.
- Power Query handles large datasets and complex deduplication far better than manual methods.
- Excel’s duplicate removal is not case-sensitive — “Apple” and “apple” are treated as the same.
- Ctrl+Z undoes the action, but only if you haven’t closed or saved the file yet.
- Advanced Filter lets you copy unique records to a new location, leaving originals intact.
- Free third-party tools exist, but Excel’s built-in features handle most real-world scenarios well.
What’s the Easiest Way to Remove Duplicate Rows in Excel
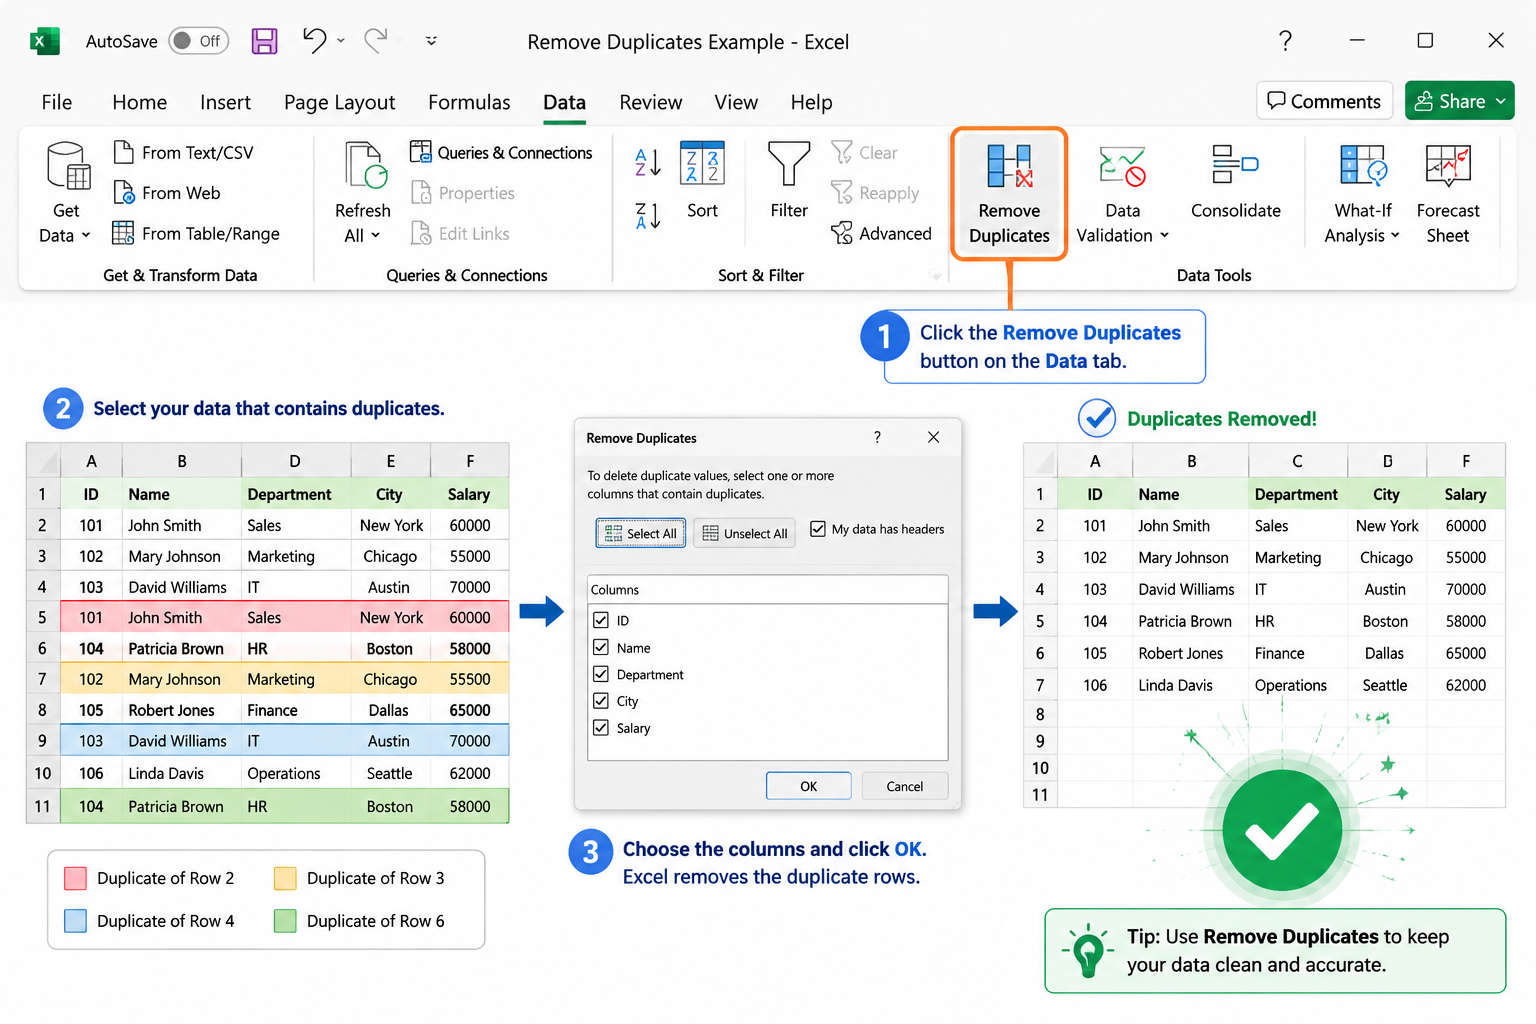
The built-in Remove Duplicates tool is the fastest and most straightforward method for most users. It takes about 10 seconds and requires no formulas or add-ins. [1]
Here’s the step-by-step process:
- Click any cell inside your dataset.
- Go to the Data tab on the Excel ribbon.
- Click Remove Duplicates (in the Data Tools group).
- In the dialog box, check the columns you want Excel to compare.
- Click OK.
Excel will show a summary: how many duplicate rows were removed and how many unique rows remain. Done.
💡 Quick tip: If your data has headers, make sure the “My data has headers” checkbox is ticked — otherwise Excel may delete your header row.
If you’re new to navigating Excel’s interface, the beginner’s guide to using Excel is a great starting point before tackling data cleanup tasks.
How Do I Remove Duplicates But Keep One Copy
Excel’s Remove Duplicates tool automatically keeps one copy — specifically, the first occurrence of each duplicate set. Every subsequent duplicate row is deleted. [1]
So if rows 2, 5, and 9 all contain the same data, rows 5 and 9 are removed and row 2 stays. No extra steps needed for this behavior.
Common mistake: Users sometimes think “keep one copy” requires a formula. It doesn’t — the default tool already does this.
How to Remove Duplicates in Excel Based on Specific Columns Only
You don’t have to check every column. In the Remove Duplicates dialog, uncheck any columns you want Excel to ignore when identifying duplicates. [2]
Example: You have a customer list with columns: Name, Email, City. If you only want to remove rows where the Email is repeated (regardless of whether Name or City differs), uncheck Name and City, and leave only Email checked.
This is especially useful for:
- Removing duplicate orders by Order ID, even if other fields differ slightly.
- Deduplicating contacts by email address.
- Cleaning product lists by SKU code.
Does Removing Duplicates Delete the Original Data
Yes — the Remove Duplicates tool permanently deletes the duplicate rows from your worksheet. [7] The original data is not stored anywhere inside Excel after the operation.
Can you undo it? Yes, but only with Ctrl+Z immediately after, and only if you haven’t closed or saved the file. Once the file is saved and closed, the deleted rows are gone.
Best practice: Always duplicate your sheet (right-click the sheet tab → Move or Copy → check “Create a copy”) or save a backup file before running Remove Duplicates. This takes 15 seconds and saves a lot of grief.
Can Excel Automatically Remove Duplicates from a Large Dataset
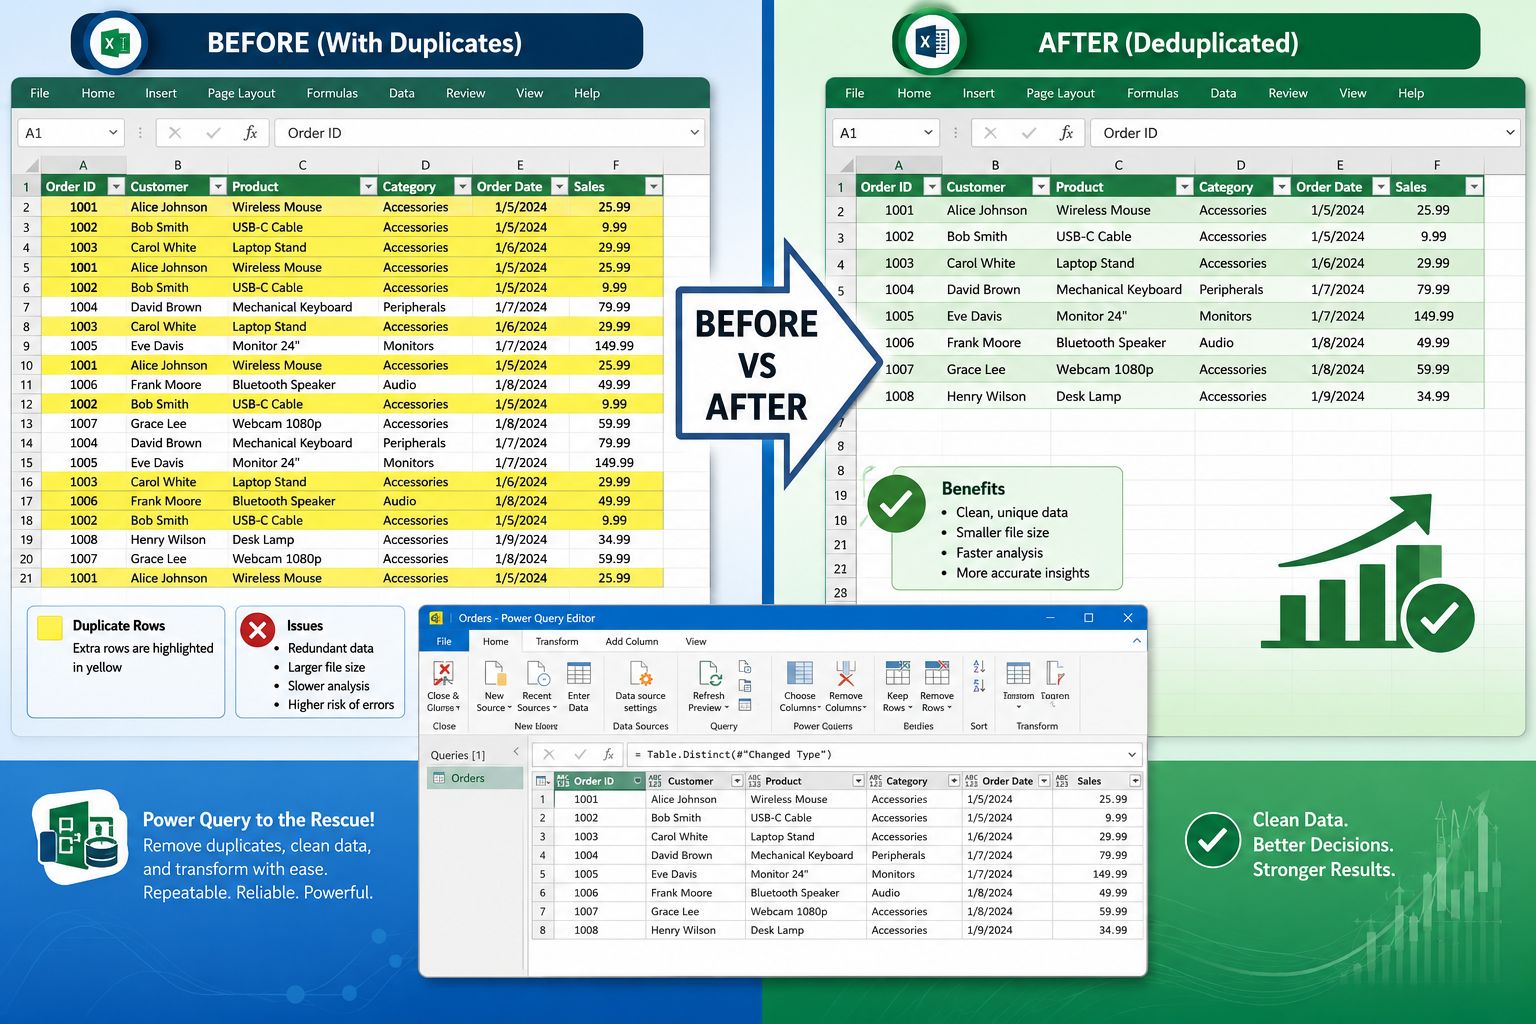
For large datasets, the standard Remove Duplicates button still works, but Power Query is a much better choice. [3] Power Query can handle hundreds of thousands of rows efficiently and lets you set up a repeatable deduplication process.
How to use Power Query:
- Select your data and go to Data → From Table/Range.
- In the Power Query Editor, select the column(s) to deduplicate.
- Right-click the column header and choose Remove Duplicates.
- Click Close & Load to send the clean data back to Excel.
Power Query’s big advantage: the steps are saved as a query. Next time new data comes in, just refresh and it deduplicates automatically. [3]
When the file is too large to process smoothly: Split the dataset into chunks, deduplicate each chunk separately, then combine. Alternatively, use Power Query’s built-in performance optimizations, which handle millions of rows far better than worksheet functions.
What’s the Difference Between Removing Duplicates and Using Filter
These two tools solve different problems. Remove Duplicates permanently deletes rows. Filtering (including Advanced Filter) only hides rows — the data stays in the file. [2]
| Feature | Remove Duplicates | Advanced Filter |
|---|---|---|
| Deletes data permanently | ✅ Yes | ❌ No |
| Original data preserved | ❌ No | ✅ Yes |
| Can copy unique rows elsewhere | ❌ No | ✅ Yes |
| Works with large datasets | ✅ Yes | ✅ Yes |
| Requires formula knowledge | ❌ No | ❌ No |
Choose Advanced Filter if you want to keep the original dataset intact and just work with unique values in a separate location. Go to Data → Advanced, select “Copy to another location,” check “Unique records only,” and specify a destination cell.
How to Remove Duplicates in Excel Without Losing Formulas
This is a real concern. When Excel removes a duplicate row, any formula results in that row disappear with it. If your unique rows contain formulas that reference other cells, those formulas remain — but the deleted rows’ formulas are gone for good.
Workaround:
- Before removing duplicates, copy the entire dataset and paste it as Values only (Paste Special → Values) into a separate sheet.
- Run Remove Duplicates on the values-only copy.
- Use that clean list as your reference data.
Alternatively, use the UNIQUE function (Excel 365 and Excel 2019) which returns a separate clean array without touching your original data or formulas:
<code>=UNIQUE(A2:C100)
</code>
This formula dynamically updates whenever the source data changes. [1]
How to Remove Duplicates and Keep the Last Occurrence Instead
Excel’s built-in tool always keeps the first occurrence. To keep the last occurrence instead, you need a small workaround. [5]
Method:
- Reverse the row order of your data (add a helper column with row numbers, sort descending).
- Run Remove Duplicates as normal (now the “first” occurrence is actually the last in the original order).
- Re-sort using the helper column to restore the original order.
- Delete the helper column.
It’s a few extra steps, but it works reliably without any formulas or VBA.
What Happens If I Remove Duplicates from a Pivot Table
You can’t run Remove Duplicates directly on a Pivot Table — the button will be grayed out or produce an error. Pivot Tables are a summarized view of source data, not a standard range. [1]
The fix: Remove duplicates from the source data that feeds the Pivot Table, then refresh the Pivot Table. To refresh, right-click anywhere inside the Pivot Table and select Refresh.
If you’re working with conditional formatting alongside your data cleanup, the conditional formatting tag page has useful related tips.
Does Excel Remove Duplicates Case-Sensitive
No. Excel’s Remove Duplicates feature is not case-sensitive. It treats “APPLE,” “Apple,” and “apple” as identical values and will remove the duplicates regardless of capitalization. [1]
If case matters to you: Use a helper column with the EXACT function to flag true case-sensitive duplicates before deciding which rows to delete manually. The EXACT function returns TRUE only when two strings match exactly, including case.
Best Way to Remove Duplicates Across Multiple Sheets
Excel has no built-in tool to deduplicate across multiple sheets simultaneously. The most practical approach is Power Query, which can combine multiple sheets into one table, deduplicate, and output a clean result. [3]
Steps:
- Go to Data → Get Data → From Other Sources → Blank Query.
- Use the formula bar to append your sheets together.
- Apply Remove Duplicates in the Power Query Editor.
- Load the result to a new sheet.
For a simpler (but manual) approach: copy all sheet data into one temporary sheet, deduplicate there, then redistribute as needed.
Are There Free Tools That Remove Duplicates Better Than Excel
For most users, Excel’s built-in tools are more than enough. But a few free alternatives are worth knowing:
- Google Sheets has a built-in “Remove duplicates” option under the Data menu — useful if you’re already working in Sheets.
- OpenRefine (free, open-source) is excellent for fuzzy matching — it catches near-duplicates like “Jon Smith” vs. “John Smith” that Excel misses entirely.
- Python (pandas library) handles massive datasets and complex deduplication logic, but requires coding knowledge.
Choose Excel if your dataset is under a few hundred thousand rows and duplicates are exact matches. Choose OpenRefine or Python if you need fuzzy matching or are processing millions of records regularly.
How to Use Conditional Formatting to Find Duplicates Before Deleting
Before removing anything, it’s smart to see what Excel considers a duplicate. Conditional Formatting highlights duplicates visually so you can review them first.
- Select your data range.
- Go to Home → Conditional Formatting → Highlight Cell Rules → Duplicate Values.
- Choose a highlight color and click OK.
All duplicate values will be colored immediately. Review them, then decide whether to proceed with removal. This step is especially useful when working with data you didn’t create yourself.
You can also use the COUNTIF function to count how many times each value appears, which helps identify which duplicates are worth investigating before deletion. [4]
For related data-cleaning skills, selecting the entire worksheet with shortcut keys speeds up your selection process before applying any of these methods.
Conclusion
Knowing how to remove duplicates in Excel is one of the most practical data-cleaning skills you can have. For most situations, the Remove Duplicates button on the Data tab gets the job done in seconds. For more control, use Advanced Filter to preserve original data, the UNIQUE function for a live deduplicated list, or Power Query for large or recurring datasets.
Actionable next steps:
- Back up your file first — always, before any deduplication.
- Use Conditional Formatting to preview duplicates before deleting.
- If you only care about specific columns, uncheck the rest in the Remove Duplicates dialog.
- For Excel 365 users, try
=UNIQUE()for a non-destructive approach. - Graduate to Power Query once your datasets grow beyond a few thousand rows.
Clean data leads to better analysis, fewer errors, and more trustworthy reports. Start with the method that fits your dataset size and comfort level, and build from there.
For more Excel productivity tips, explore the Excel Tips Blog and the full library of Excel how-to videos.
FAQ
Q: Will Remove Duplicates affect my entire spreadsheet or just the selected range? A: It only affects the range you selected (or the table your cursor is in). Rows outside that range are untouched.
Q: Can I remove duplicates from a single column without affecting other columns?
A: Yes — select only that column before clicking Remove Duplicates, or use the UNIQUE function on just that column: =UNIQUE(A2:A100).
Q: What if Excel says “No duplicate values were found” but I can see duplicates? A: Check for hidden spaces or different formatting. “Apple ” (with a trailing space) and “Apple” look identical but aren’t. Use TRIM to clean your data first.
Q: Does the UNIQUE function work in older versions of Excel? A: No. UNIQUE is only available in Excel 365 and Excel 2019. Older versions need the Remove Duplicates button or formula-based workarounds.
Q: How do I remove duplicates from a filtered list only? A: Remove Duplicates works on visible and hidden rows alike. To deduplicate only visible rows, copy the filtered results to a new sheet first, then run Remove Duplicates there.
Q: Can I prevent duplicates from being entered in the first place? A: Yes. Use Data Validation with a COUNTIF formula to block duplicate entries at the point of input. [6]
Q: Is there a keyboard shortcut to open Remove Duplicates? A: No dedicated shortcut exists, but you can press Alt → A → M in sequence to navigate the ribbon to Remove Duplicates without using the mouse.
Q: How do I remove duplicates based on two columns together (like First Name + Last Name)? A: In the Remove Duplicates dialog, check both columns. Excel will only remove a row if both columns match another row simultaneously.
References
[1] Find Remove Duplicates Excel – https://zapier.com/blog/find-remove-duplicates-excel/?utm_source=openai [2] Remove Duplicates Excel – https://www.goskills.com/excel/resources/remove-duplicates-excel?utm_source=openai [3] How To Remove Duplicates In Excel – https://www.reflexion-labs.com/blog/how-to-remove-duplicates-in-excel?utm_source=openai [4] Duplicate – https://excelx.com/countif/duplicate/?utm_source=openai [5] Keep One – https://excelinsider.com/excel-pro-tips/remove-duplicates/keep-one/?utm_source=openai [6] Duplicates – https://excelx.com/remove/duplicates/?utm_source=openai [7] How To Remove Duplicates In Excel – https://www.customguide.com/course/excel/how-to-remove-duplicates-in-excel?utm_source=openai